

Install Appflare
Install from your browser at appflare.dev/deploy, or with Cloudflare's Deploy button. Both end in the same setup wizard.
Install from your browser
 Install Appflare
The recommended way. Open appflare.dev/deploy, sign in to Cloudflare, choose the account and Appflare's address, and the page deploys Appflare there. You need a Cloudflare login and nothing else: no API token, no Git account, nothing on your computer. Install from your browser goes through it step by step.
Or use Cloudflare's Deploy button. It goes through a copy of Appflare in your GitHub or GitLab account, which you remove afterwards. Deploy with the button walks through it.
Every way deploys the same signed release into your own account and ends in the same setup wizard.
| From your browser | Cloudflare's Deploy button | The command line | |
|---|---|---|---|
| How | Open appflare.dev/deploy | Select the button: Deploy with the button | Run npx create-appflare; see Advanced below |
| You need | A Cloudflare login | A GitHub or GitLab account | Node.js 22 |
| Appflare connects with | Cloudflare sign-in, set up by the page | An API token you create during setup | An API token you create during setup |
| Who touches your account | Appflare's hosted installer, with a short-lived token, during the install | Cloudflare's Workers Builds | Wrangler, with your login |
| Leaves behind | Nothing once setup is done | A copy of Appflare in your Git account and a Workers Builds connection, which you remove afterwards | Nothing |
Which way to choose
- From your browser is the shortest, and the one to pick unless something below applies. You choose Appflare's address before it is deployed, so you sign in and add passkeys there from the first visit. The price is trust: for a few minutes Appflare's hosted installer holds a token that can do everything Appflare can. What the installer sees and keeps explains it.
- Cloudflare's Deploy button suits you if no Appflare service should touch your
account and you have a GitHub or GitLab account. You clean up a repository copy
afterwards. Appflare starts on
workers.dev; setup's Where should Appflare live? step can move it to your domain, and you then sign in again there. - The command line is for the rare case where neither works.
Whichever you pick, you can change how Appflare connects to Cloudflare later; see Appflare's Cloudflare connection.
Advanced: install from the command line
Install with npx create-appflare
Use it if your Cloudflare account does not allow signing in to apps. Cloudflare lets account admins block public OAuth apps, and then the install from your browser cannot sign in.
Requirements
- Node.js 22 or newer on the machine you install from.
- A Cloudflare account. The free Workers plan works. Some apps in the catalog need more, and say so on their catalog page.
- A
workers.devsubdomain on the account. If the account has none, wrangler offers to register one during the install. That needs a terminal; otherwise register it in the Cloudflare dashboard first. - Permission to create an API token for the account. An account-owned token needs the Super Administrator role. Other members can use a user token.
Run the installer
npx create-appflareFrom a checkout
To run the installer from this repository's source instead, you need Node.js 22 and pnpm:
git clone https://github.com/appflare/appflare
cd appflare
pnpm install
pnpm --filter "create-appflare..." build
node packages/cli/bin/appflare.js
node packages/cli/bin/appflare.js, run from the checkout, takes the same options as
npx create-appflare.
What the installer does
- Checks the Node.js version and your Cloudflare login. If wrangler is not logged
in, it opens
wrangler loginin your browser. If your login reaches several accounts, it asks which one. SetCLOUDFLARE_ACCOUNT_IDto skip the question. - Refuses to continue if a Worker named
appflare, a D1 database namedappflare, or a KV namespace titledappflare-kvalready exists. - Downloads the latest manager release from github.com/appflare/appflare/releases. It checks the release's Ed25519 signature against the public keys built into the installer, and the sha256 of every file. Nothing is deployed unless all of that passes.
- Deploys the manager with
wrangler deployfrom a temporary directory. Wrangler creates the D1 database and KV namespace. - Sets one secret on the manager to a random value:
BETTER_AUTH_SECRET, which signs sessions. - Waits for the manager to answer, then prints its address,
https://appflare.<your-subdomain>.workers.dev/. Open it to finish setup. The address carries no secret.
The temporary directory is removed at the end. Nothing is written to your current directory, and no git repository is created.
Options
| Flag | Meaning |
|---|---|
--version <x.y.z> | Install that manager release instead of the latest. |
--name <name> | Worker name. Defaults to appflare. The D1 database and KV namespace follow it. |
-y, --yes | Never ask. Fail where a question would be needed: several accounts, no workers.dev subdomain, or a Workflow name that another Worker owns. |
--artifact-dir <dir> | Install from a downloaded release in <dir> instead of fetching it. The signature is still required. |
--no-telemetry | Send no anonymous usage data, and install the manager with its anonymous report turned off. |
-v, --version | Print the installer's version. --version followed by a value picks the release instead. |
-h, --help | Print the options. |
If GitHub rate-limits the download, set GITHUB_TOKEN. The installer sends it only
to api.github.com.
If the install fails after the deploy, the installer prints the wrangler commands
that delete what it created, so you can run it again.
The installer only installs. Once the manager runs, you manage it from its own settings pages. The installer prints each address with your manager's address in front:
| To | Go to |
|---|---|
| See the running version and update Appflare | Settings > Updates > Appflare version (/settings/updates#appflare). See Update Appflare. |
| Return to an earlier manager version | Settings > Updates > Recent versions (/settings/updates#versions). See Roll back. |
| Enable, update, or disable sandbox builds | Settings > Building apps > Build in your account (/settings/building#sandbox). See Sandbox builds. |
| Remove Appflare and its data | Remove Appflare in Settings > Your account > Danger zone (/settings/account#danger-zone). See Remove Appflare. |
The setup wizard
Open the manager's address. Until setup is finished, every page of the manager leads to the setup wizard: one page with three steps (four when the account has an active domain), each shown in place of the one before.
After an install from your browser, the page that installed Appflare does step 1 for you and opens Appflare at step 2. Anyone who opens that Appflare in another browser first sees Finish where you installed Appflare, with Connect with an API token instead as the way to do step 1 here.
1. Connect Cloudflare
The manager needs a Cloudflare API token to create and update apps in your account. Cloudflare does not let a Worker or wrangler create one, so this step happens in the dashboard:
- Select Create token. The dashboard opens an account-owned token form named
Appflare, with the permissions below already selected; you do not pick any. Choose your account, scroll down, choose Review token, then Create token, and copy it. If you are not a Super Administrator, use Create a user token instead. What the token can do on the setup page lists each permission and the feature that uses it. - Paste the token.
- Select Continue. In one step the manager checks that the token is active, can manage Workers, and belongs to the account the manager runs in (it looks for the version of itself that is serving the page in the token's account), then saves it and shows the account it connected to. It warns about permissions it cannot confirm, and a refused token shows why in place.
The token is the only thing that guards setup. Anyone who can create a token for your account already controls it, so there is no separate setup password. A token for another account is refused with a message that names the account it belongs to. The page allows 20 tries per network address in 10 minutes.
2. Create the owner account
Enter a name, an email, and a password of at least 12 characters. This first user is the owner: an admin who is also the only one who can change roles, delete users, or hand ownership over. You are signed in right away.
When the account has an active domain, a step comes next that asks Where should
Appflare live?: keep the workers.dev address, or move Appflare to a name in one of
your domains. Later skips it. See
Give Appflare its own address.
Only the browser that saved the token can do this step, for 30 minutes. Anyone else who opens the manager in the meantime sees only step 1, and once the owner exists they see the sign-in page. If you close the browser before this step, open the manager again after 30 minutes and paste the token again. After an install from your browser, the browser the deploy page brought here holds the step instead; if its link ran out, see Create the owner account.
3. Check your account
The manager reads what your Cloudflare account has that apps rely on. A bar shows how many things are ready, out of those your plan can have. Each row names one thing, says why apps need it, and shows its state:
- Ready: the account has it.
- Needs action: it is off, and an app you installed (or are installing) needs it.
- Not set up: it is off, and none of your apps needs it yet. Turn it on when an app you want needs it.
- Paid plan only: only Workers Paid includes it.
- Could not check: Appflare could not read it. Select Check again.
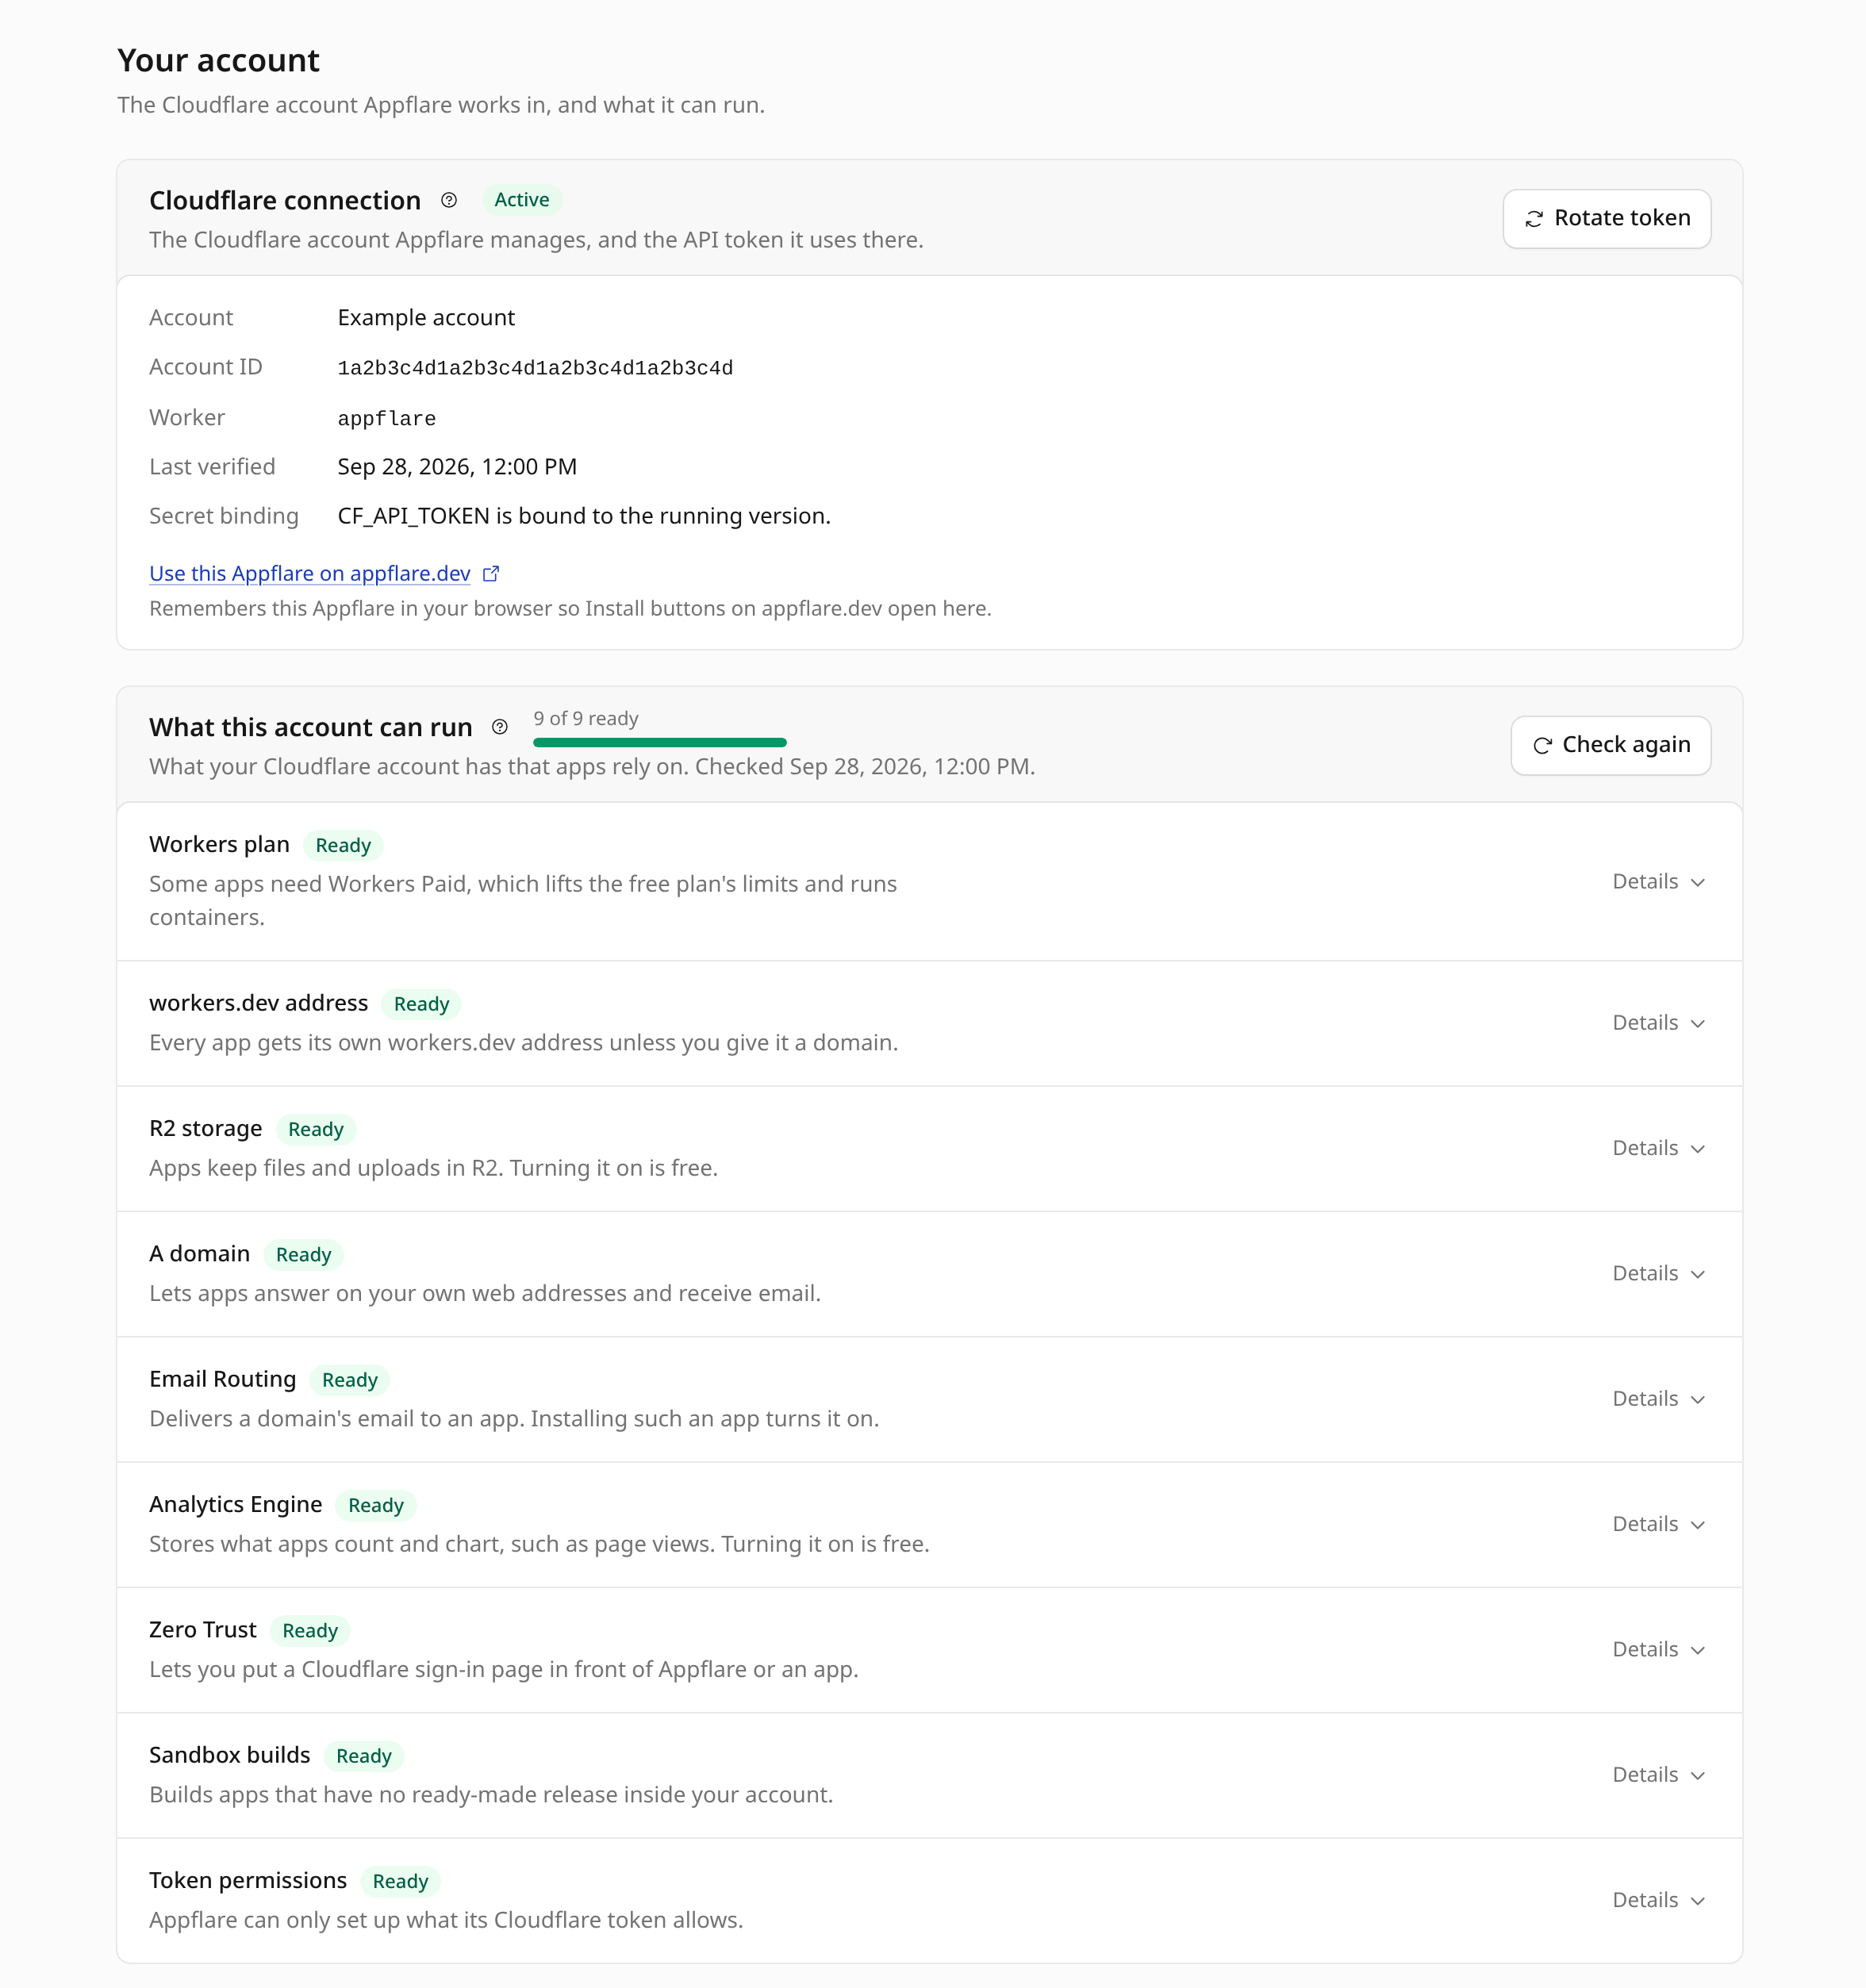
A row that is off has one button: Turn on in Cloudflare opens the right page of the Cloudflare dashboard, Edit token in Cloudflare opens the token's page, Choose plan lets you say which Workers plan the account is on when Appflare cannot read it, and Set up opens Settings > Building apps > Build in your account. Details shows what Appflare found, when it checked, what went wrong if it could not tell, and how many catalog apps use it.
| Row | What it is for |
|---|---|
| Workers plan | Workers Paid lifts the free plan's limits and runs containers; some apps need it. |
| workers.dev address | Every app answers on its own workers.dev address unless you give it a domain. |
| R2 storage | Where apps keep files and uploads. Turning it on is free, but Cloudflare asks for a payment method first. |
| A domain | A domain on Cloudflare, for custom domains and apps that receive email. |
| Email Routing | Delivers a domain's email to an app. Installing such an app turns it on. |
| Analytics Engine | Stores the events apps count and chart, such as page views and link clicks. It is off until you open its page in the dashboard once; apps that write to it cannot be installed until then. |
| Zero Trust | Needed before Cloudflare Access can put a sign-in page in front of the manager or an app. |
| Sandbox builds | Builds apps that have no ready-made release inside your account. Paid plan only: it needs Workers Paid, R2 turned on, and the Containers permission. The first app that needs a build turns it on; Set up lets you turn it on sooner. |
| Token permissions | Whether Appflare's token has the permissions it needs. Details names the optional ones it does not have. |
On a new account most rows read Not set up; that is expected. Only Needs action rows stand in the way of something you have installed.
Select Check again after changing something in the dashboard. Select Finish to go to the manager. The same list stays in Settings > Your account > What this account can run.
The token template requests:
| Permission | Access | Used for |
|---|---|---|
| Workers Scripts | Edit | Uploading, deploying, and deleting app Workers and the manager itself, with their secrets, cron triggers, routes, and static assets. |
| Workers KV Storage | Edit | KV namespaces for apps that bind KV. |
| D1 | Edit | D1 databases, app migrations, and Time Travel restores. |
| Workers R2 Storage | Edit | R2 buckets for apps that bind R2. |
| Queues | Edit | Queues for apps that use them. |
| Vectorize | Edit | Vectorize indexes for apps that bind them. |
| Account Settings | Read | Finding the account the token belongs to. |
| Access: Apps and Policies | Edit | Only for Cloudflare Access: creating, updating, and deleting the Access applications and policies that guard the manager (Protect with Cloudflare Access) or an installed app. |
| Access: Organizations, Identity Providers, and Groups | Read | Only for Cloudflare Access: reading the Zero Trust organization's team domain and login methods. |
| Access: Service Tokens | Edit | Only for protecting installed apps with Cloudflare Access: each protected app gets its own service token, used only by Appflare's health checks of that app. Appflare creates it, renews it before it expires, and deletes it when the app stops being protected or is uninstalled. |
| Zone | Read | Only for custom domains, external domains and apps that receive email: listing your domains. External domains need it on all zones of the account, to tell whether a hostname is in one of your own domains. |
| DNS | Edit | Only for custom domains: seeing, and with your consent replacing, the DNS records at a new domain's hostname; for external domains: adding the gateway's DNS record; and for apps that receive email: reading a domain's MX records before turning Email Routing on. |
| Workers Routes | Edit | Only for custom domains: attaching an app's Worker to a hostname; and for external domains: routing the gateway domain's requests to the gateway Worker. |
| SSL and Certificates | Edit | Only for external domains: adding and removing Cloudflare for SaaS custom hostnames on the gateway domain, and setting its fallback origin. |
| Zone Settings | Edit | Only for apps that receive email: turning Email Routing on for a domain, and off again on uninstall. |
| Email Routing Rules | Edit | Only for apps that receive email: creating and deleting the routing rules and setting the catch-all. |
| Email Routing Addresses | Read | Only for apps that receive email: showing which destination addresses are verified. |
| Billing | Read | Only for detecting the account's Workers plan: Appflare lists the account's subscriptions and reads their plan names, never invoices or payment details. |
| Hyperdrive | Edit | Only for apps with a database elsewhere: creating a Hyperdrive configuration from the connection string you enter, replacing it when you change the string, and deleting it on uninstall. |
| Pipelines | Edit | Only for apps that stream events: creating a Pipelines stream, sink and pipeline for each stream the app uses, and deleting them on uninstall. |
| Workers R2 Data Catalog | Edit | Only for apps that stream events, and added by hand (the template link cannot select it): removing a bucket's R2 Data Catalog when an uninstall deletes the bucket. Without it the bucket is still deleted. |
| Account Analytics | Read | Only for usage and spend protection: reading how much each app uses of Workers, storage and the other services it runs on, to show its usage, send the usage alerts you set, and pause an app that runs away. |
The permissions marked "Only for" are optional: you can remove them from the form if you will not use that feature, and everything else works without them.
Where the token lives
The manager stores the token as an encrypted secret, CF_API_TOKEN, on its own
Worker, through the Cloudflare API. Saving it redeploys the manager, which takes a
few seconds. The token is never shown again, never written to the database, and
never included in logs. See Security model.
To replace the token later, open Settings > Your account > Cloudflare connection, select Change how Appflare connects, and choose Use a new API token. The new token must be for the same account. Revoke the old one in the Cloudflare dashboard afterwards. The same choice can switch Appflare to Cloudflare sign-in, which grants every permission Appflare uses except Billing, all at once. See Appflare's Cloudflare connection.